a little experiment

oil and water

a simple set-up: a clear casserole dish raised above some colourful wrapping paper. Add water, and a bit of oil, and start snapping! It's truly addictive.

One of my favourite parts about teaching is how much I end up learning from the process.  In a recent class one of my students mentioned an intriguing idea for a macro shoot.  He shared this video with me, and it seemed too interesting an idea to pass up.  The beauty of this project is in the simplicity.  All you need is a clear glass bowl, some cooking oil, water, and some colourful paper or fabric.  The photographer in the video uses an old hawaiian shirt, but my closet is slightly less exciting, so I used some spaceship wrapping paper.  Simply raise the bowl above the floor using glasses or books or whatever else you have handy, add water and a bit of oil, place the colourful paper/fabric underneath, and start shooting!

Like so many of my projects, this probably would have been much easier with a tripod, but mine is on its last legs (pardon the pun) and could not be trusted to support my camera pointing straight down into a dish of oil and water.  So, hand-holding it was.  Because I was shooting inside instead of outdoors on a bright sunny day, I used a studio flash to give me the light I needed, which meant my shutter speed was nice and fast, even at 100 ISO.  The tricky thing was focus.  Autofocus was having a hard time finding the edges of the shapes, particularly after I stirred the water to break up the oil bubbles, so I switched to manual mode and tried to keep my camera on a level where I had focus just on the surface of the water and oil.  I ended up with a bunch of photos that weren’t quite sharp enough, but I do like the flexibility of being able to aim the camera on the fly instead of relying on whatever composition the camera is pointing at from the tripod.

The possibilities from this simple set-up are really endless, and I definitely plan to explore this in more depth in the future.  My next experiment will most likely involve trying to get nice and close up to those individual bubbles to see what sort of reflection/refraction I can get from the paper below.  Been having so much fun with this year’s experiments so far – can’t wait to try something else new and exciting!

oil and water

experimenting with depth of field to isolate just a few bubbles.

Project:52, pet portraits (week 5)

BugBear

a simple, window-lit portrait. The contrast between the cool-toned light from the window behind Bug and the warm-toned lamp light beside him add some nice colour to a black kitty.

Because Erin and I are both avid cat-lovers, doing pet portraits for one of our weekly photography challenges this year was pretty much a given.  As we are still in avoiding-outside-as-much-as-possible mode, this seems as good a time as any to do some creative work with our favourite furry subjects.  Being a cat owner and a photographer, I do already have quite the collection of kitty portraits in my photo library.  So while I do love the above portrait, in order to properly challenge myself I decided to try something a little bit different for this project.

One of my favourite things to do with the cats (other than curl up on the couch with one on my lap of course!) is watch them chase a laser pointer.  Both of our cats absolutely go nuts as soon as that little red light appears, and they’ll stalk it for hours if we let them.  For this week’s photo, I wanted to see what sort of images I could capture of them playing.  This concept was complicated slightly by the fact that my tripod is missing the piece that would hold the camera in a vertical position.  Because I imagined a vertical shot with the trail of the laser light visible, I had to prop my camera up on the coffee table (with the lens rested on a book) in order to keep it stable for the longer shutter speeds.

It required a fair bit of trial and error to get the exposure right.  I started shooting on my default setting, AV, with an aperture of f9.  With an ISO of 100, my shutter speed was way too long at 15 seconds.  By opening the aperture to f4.5, the camera was giving me shutter speeds between 2.5 and 4 seconds.  And that variation was the problem:  depending on how dominant the cat was in the frame, the camera re-calculated the shutter speed to compensate for the amount of black cat against the white wall.  So sometimes there would be a nice laser light trail, and other times there would only be a short bit.  Switching to manual mode let me keep my shutter at 2 seconds, which gave me just enough time to record a nice bit of the laser’s light and the cat’s movement as she chased it.  This type of shoot requires a whole lot of patience and practice:  cats aren’t always the most cooperative of models at the best of times so you certainly have to be prepared to shoot a whole lot in order to get a couple of good images, particularly when trying to capture them at play.  Adding the laser into the mix provides another unique variable.  I found I needed to do a fair bit of post-processing to get the laser to stand out the way I wanted.  For this image I decreased the saturation to remove some of the yellow tones in the image, added a curves layer to increase the contrast and applied a Topaz Adjust filter to really bring out the texture in the floor and the cat’s fur (as well as editing the contrast of the laser separately to ensure it stood out.)

If I try this again, I’d love to try drawing shapes or words with the laser – but for now this was quite a fun experiment, and I’m quite pleased with the shots I got.  (Think Meeka definitely enjoyed her modelling stint too!)

Next week’s challenge:  food photography!

Chasing the laser

Aperture f4 at 2.5 seconds.

Project:52, sparkly ice (week 4)

miniature ice landscape

I can't get over how magical and surreal a tiny patch of ice can become with the right perspective, perfect sunlight and a simple close-up filter.

Yesterday morning it was cold.  Cold enough to cancel my regularly scheduled morning walk with a friend, cold enough that the snow makes hard crunchy noises underfoot and your breath makes huge clouds around your face, cold enough for most normal people to avoid the outdoors whenever possible.  So why is it, when I looked out the window that morning that I bundled on extra layers of clothing and ran outside into the parking lot?  Well, clearly, because I am a photographer.  (You could probably safely substitute ‘crazy’ for ‘photographer’ in a multitude of cases … this one included!)

But honestly, how could I resist?  The morning sun was just coming up over the rooftops, and that extra-cold snow sparkled all kinds of awesome when the light hit it.  Since Erin and I decided that our weekly photo challenge this week was to bring some sparkle to the snow, I figured that this was the perfect opportunity and not to be missed!  Such are the trials of a photographer really.  We’re always chasing moments, and trying to capture the perfect light.  So who am I to stay cozy inside when that perfect light is sparkling just outside my window?

In fact on this very chilly morning, I actually had to make 2 trips outside to satisfy the photographer bug in me.  When I first saw that gorgeous golden sun kissing the snow, I was just a bit too slow pulling on my winter gear and made it outside just as the sun faded behind a thin layer of clouds.  I was able to get a couple decent shots before my extremities began to chill, but nothing truly sparkly and epic.  Of course, not 15 minutes after I was back inside, the sun broke out of the clouds again … so back out I went.  This time, I noticed the lovely little patch of ice next to our walkway.  Frozen drips from the last warm day had left a bubbly impression on the surrounding snow, and the light was hitting it just perfectly.  What’s a photographer to do but lie down on the concrete and start shooting?  I had one of my close-up filters screwed onto my 50mm 1.4 lens in order to get nice and close to the tiny hills of ice.  Usually I like to keep the lens wide open to blur the background, but with the close-up filter I needed to give myself a bit of extra depth of field in order to capture the sparkly bokeh as the sun reflected off the ice and snow, so I opted for an aperture of 3.5.

Because I was back and forth between inside and out, my white balance inadvertently got left on tungsten.  However, when I checked my screen after the first couple of shots, I really liked the look, so I didn’t bother to switch it to a more accurate setting.  One of the bonuses of shooting files in RAW is that I can always change it back to ‘normal’ later while editing, and I did test it, but in the end the blue was just too cool.  As far as post-processing goes, there was really very little to do:  I increased the contrast with a curves adjustment, de-saturated the blue just a touch, and removed a couple tiny flecks of black seeds that were caught in the ice.  The final image reminds me of some amazing bug photography here … I almost wish I had a teeny figure to include in the scene.  Alas, this morning’s snow has hidden that ice world from view – I’ll have to see if I can get myself a teeny tiny little model (of the non-bug variety, preferably!) before I find the next frozen miniature landscape.


Project:52, shadows (week 3)

this will become part of an ongoing series of 'portraits' of this doll. I haven't worked with her in a while, and I've really missed her! this project was also the perfect excuse to use her little teddy, which I haven't had occasion to do before.

Ok, maybe you noticed … I’m a tad bit behind in this whole ‘Project:52’ thing. Only 2 complete projects so far, and it is now the beginning of February! Oops. Funny how time just slips away on you. With 3 new photography classes starting up this past week, my month has been fairly busy with prep work. But hopefully, now that the classes have all gotten underway, life will allow a little more leeway for photo adventures! These weekly projects definitely are a great excuse to stretch the creative muscles.

Our third photo ‘assignment’ was shadows. As soon as we set the project, I knew I wanted to do a shoot with my little doll – in fact I had the final image pretty solidly envisioned in my mind. This is often a lot trickier than going into a shoot with an open mind because it can be rather difficult (and sometimes impossible) to create that perfect image from in your head.  But with some patience and trial and error, I managed to get almost exactly what I was imagining.  My original vision included the shadow of a hand reaching down towards her, but that proved logistically tricky:  attempting to place the hand close enough to the subject or wall so that the shadow is clearly defined as a hand, but far enough away so it’s not in the shot was more of a riddle than I could solve.  Looking through the images, including that extra shadow complicated the image more than I liked, so I’m quite happy with the simplicity of the spotlight.

One of the clear advantages of this weekly project is that already I’m considering light in a new way.  As a primarily natural light photographer, being forced to use light to freeze the action of falling fruit or perfectly frame a tiny doll is a wonderful challenge!

my fancy homemade studio

to get the spotlight effect I wanted, I used a desk lamp shot through a small hole in a piece of construction paper. I set a piece of frosted glass just to the right of the frame to bounce a little light back into the shadows on the subject.

In case you’re slightly curious about this doll, you’ll probably see a fair bit more of her as this project progresses.  She is actually a re-purposed McDonald’s Happy Meal toy that I took apart and remade as a part of an independent study in my final year at NBCCD.  The project (for class) ended with a series of photographs of the doll in various locations around the city.  But I’ve kept her with me ever since, just living in my camera bag, and take her out whenever a location inspires me.  I’m hoping to fine-tune this series and start posting a gallery sometime soon(ish) which will include more details about my process and why I’m mildly obsessed with this tiny little plaything.

I need some colour!

close-up, bird of paradise

It’s winter, so of course I’m feeling a little bit blah.  I often find it a real struggle to get inspired with so little colour around in my world this time of the year.  Luckily, the University just up the street has a fantastic greenhouse with all sorts of tropical plants.  It’s a great place to hide out from the winter and be creative.  Last week was one such opportunity, and I spent most of the time testing out my close-up filters.  I’ve had the filters for a couple of years now, but they don’t make it out of my kit nearly as much as I would have thought.  The greenhouse, however, is the perfect place for them.

On this most recent visit, my favourite flower, the hibiscus, was not in bloom, so I was forced to seek my colour fix in other places.  The brilliant orange of the bird of paradise drew my lens, and I spent most of my time trying to capture it in a unique and interesting way.  With a close-up filter on my 1.4 lens, my depth of field got razor thin – which can be absolutely magical…  except that even the slightest wobble with such a shallow depth of field would throw the focus completely out of whack.  It’s funny how wobbly you realize you are when you are trying to be perfectly still.  A smarter, more prepared photographer would have had a tripod along for cases such as this.  But not me!  I laugh in the face of preparation, and scoff at the mere … well, that’s not entirely true.  I do very much value being prepared, and my camera bag is constantly stocked with all of my other camera supplies…  I just never really think of that poor tripod until it’s too late.  So, again, this shoot was complicated by the fact that I had to focus on keeping myself as still as possible – not to avoid camera shake this time, but simply to keep the focus where I wanted it.

Despite my knack for providing extra challenges such as this for myself all the time, I’m quite happy with this shot.  It’s a lot more abstract than I usually shoot, but the vibrant colour is just what I need in the middle of this white winter, and I did eventually manage to get that petal curl perfectly in focus.  It will definitely fulfill my colour fix until my next trip to the greenhouse … or Mexico!

Project:52, splash photography (week 2.5)

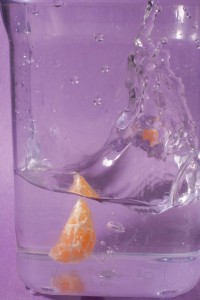
The idea of a Project:52 is to experiment with something new each week, but since our original attempt at splash photography seemed much more like a trial run than a wild success, Erin and I decided to give it a second go.  We still have a plan for another shoot this week, but we really wanted to take another crack at capturing some great splashes.  This time, our set-up was much more refined:  we used a tall, cylindrical glass vase to hopefully cut down on the distortion we got with the plastic rectangular container, and set our cameras on tripods so the camera and settings remained stable while we could watch more closely to capture the splash.

We also decided to experiment with different coloured backgrounds and different types of fruit.  With several vibrant colour combinations available and tested, for some reason I was drawn to a  monochromatic scheme:  pairing blackberries with black construction paper (which read as a dark, purpley grey under the studio lights.)  This sudden interest in monochrome is something I first played with in last week’s photo of the week,  and I’m not quite sure I understand why this is working for me lately, but this year is all about experimentation, so I’m gonna go with it!

Even with our refined set-up, I did do quite a lot of clean-up in PhotoShop to get rid of unwanted water and reflections on the walls of the vase.  I quite like the results, although the picky girl in me can notice a bit of blur in some of the water drops.  But, it’s an experiment, and I’m loving the learning process!

a legal diversion

An article popped up in my news feed this morning that is kind of scaring me as an artist.  Ok, it’s kinda scaring me a lot.

The article, found here (which discusses the original article in Amateur Photographer here) discusses a case in the UK where an image was declared to be a copyright infringement despite the fact that it looks rather different than the original.  Now it just so happens that in a previous life I was trained and worked as a paralegal, so I actually went through and read the entire judgment (which can be found here.)  I won’t claim to understand all of it – it’s been a while since my brain has had to wade through legal jargon – but I found little in it to assuage my fears.  Granted, this is a UK decision and has little direct bearing on copyright law in Canada, but I worry it could set a disturbing precedent.

My albeit cursory examination of the document leads me to believe that the judge relied fairly heavily on the intent of the parties in this case.  This may be because there was a previous dispute between these two parties over infringement of the same image.  I haven’t been able to find that judgment (and I doubt that my brain could handle reading another lengthy legal article at this point), but it seems that the defendant in this case was also found to be infringing in the previous case.  So, the second image was made specifically with the intent of having a similar image without infringing.  This does seem rather sneaky to me, and as an artist I certainly wouldn’t want someone copying me just enough so as not to get caught (or have to pay me for my work and vision).  It also appears that the defendant was given the opportunity to licence the original image in question from the photographer, but declined.  (Also strange, but without more details I really can’t comment much on that.)

Here are the images in question, as taken from the legal decision document.
The first is the claimant’s image, taken by Mr. Fielder for Temple Island Collections Limited in August of 2005.

The second image was commissioned by the defendant, Mr. Houghton of New English Teas and created by Sphere Design, with photos from Mr. Houghton and a stock photo.

To me, there are significant differences between these two images.  The perspective and shot angle are different, as are the architectural elements included. The main similarities are the selective colouring, the general location and the subject.  This may sound like a lot, but take into account what the subjects are:  Big Ben, the Houses of Parliament, and a double-decker bus.  These are all iconic landmarks in London, and the claimant (the original photographer) certainly wasn’t the first person to make an image in that location.  It is even stated in the claim that he was standing surrounded by other photographers when he took the picture.  Some of the images shot by others on the scene that day are bound to be more similar than the infringing image.  You certainly can’t argue that the selective colour is unique either – in the claim, the photographer admits to being inspired by the colouring in Schindler’s List, and the defendant was able to produce as evidence several other photographs of significant London landmarks using selective colour.

I really don’t like that the defendant’s image was created with the express purpose of re-creating the original as closely as possible without getting in trouble, but in the end, it is a different image, and I really don’t see how the similarities the judge noted outweigh the differences.  I don’t really like the defendant’s version, I think the original is a much stronger image (and I seriously wonder why they didn’t decide to licence the image if/when given the opportunity) but I don’t necessarily think that it should be considered an infringement.  In the Amateur Photograph article, photographic copyright expert Charles Swan, a lawyer at Swan Turton, noted that “‘Inspiration’ and ‘reference’ are fine in themselves, but there is a line between copying ideas and copying the original expression of ideas which is often a difficult one to draw.”

It is a difficult line to draw.  No artist wants their work stolen, and they should be protected and have legal recourse when that happens.  But the precedent set here gives a wide open definition to what can be considered ‘copying’.  And that’s what really worries me.  Part of being a photographer is looking at LOTS of images – being inspired by them and getting ideas from what others have done before.  Learning by attempting to reproduce a certain technique is one of the key ways to grow as an artist.  There are many examples of visionaries and artists advocating the value of “stealing” for this reason.  Photographer Chase Jarvis wrote a post titled “How to Steal Ideas Like an Artist” where he states “The history of art is … an evolution of ideas, of appropriation and application”.  Steve Jobs admits to “be[ing] shameless about stealing great ideas.”  You can see the YouTube video of that here where he quotes Picasso:  “good artists copy, great artists steal.”  There are even classes in universities teaching painting by copying the Masters:  by learning how DaVinci, Rembrandt and Monet painted, you become more skilled and build the basis for your own visual language.  The key to all of this is that your individuality as an artist (or just as a person with a unique perspective on life) will prevent you from directly mimicking the work.

Perhaps the line between the idea of copying for learning and copying for money-saving or licence-avoiding is too fine a line to draw.  But consider cases of more accidental similarities:  I look at several photography websites every day for inspiration, new tips and just a daily dose of beauty.  I probably see 30+ images in a day, much more if I’m bored or researching a particular topic. I don’t remember every single image that I’ve seen, but they inform my sensibilities  nonetheless.  My intent is always to explore and expand upon my artistic vision, not to copy someone else’s work.  But if an image I create ends up looking similar to another image, would this new precedent make me the target of a lawsuit for infringement?

And that’s where I see a big potential problem here.

p.s.   I should mention that (of course) my training as a paralegal does not qualify me in any way shape or form to provide a legal opinion on this matter, it just makes it almost possible for me to read through the judgment’s legalese without going completely cross-eyed.

photo of the week: first snow

Another of my ongoing photo projects on my resolutions list this year actually began midway through last year.  I happen to have one of the best extended families in the world, but circumstances currently have me living 2 provinces away from them.  In an effort to keep in better communication with them, my Dad suggested that sending a photo in an email every once in a while would be a great excuse to keep in touch.  And so, the photo of the week(ish) was conceived.  I’m not always able to keep my once-a-week deadline, but it keeps me thinking of my family and finding something beautiful and interesting to share with them.  It works wonderfully for my creativity as well, forcing me to either go out and shoot something new, or dig through my archives and find something worthy of sharing.  This is certainly helping me to determine if a photo is worth the megabytes it occupies on my hard drive:  if it’s not good enough for me to show my family (or use as an example in one of my photo classes), why am I keeping it, really?  This is a hard lesson for a ‘collector’ such as myself to learn, but I’m getting there slowly, and if I ever have 2 or 3 free days to dedicate to the project, my image library can expect a major overhaul.

For the time being though, this week’s image is not new, but not entirely old either.  It was taken on our first snow of the winter, near the end of November.  This is my absolute favourite kind of snow, the huge fluffy flakes that drift lazily down to earth, blanketing everything so gently.  (And it usually occurs when temperatures are not so cold as to discourage the photographer or cause too much concern for the gear, which is equally awesome.)  In keeping with the spirit of the new year, I’m also trying something a little bit different with the editing.  Normally I am all about colour – I want my photos to be as bright and happy as possible.  But looking at this photo, it just didn’t seem right.  I loved the image, but because the rose was fairly wilted, the colour was rather yellowy (not something you want to make more vibrant!).  I converted the image to black and white in Photoshop and played the filters until the rose and background were the appropriate brightness.  Pure black and white didn’t quite fit my vision either, so I brought just a little bit of colour back into the flower and the leaves with a layer mask.  A selective sepia effect makes the touch of colour slightly less obvious (we don’t want to be too cliched now!) and a curves adjustment heightens the contrast.  Black and white images tend to draw attention to the forms created within the frame, and I just love the shape of the bowed rose here.  The fact that I caught a few drifting flakes in the frame is just fortuitous!

Today’s temperature is a balmy +2 degrees (so strange for mid-January!) … but I’m hoping for some more fluffy and inspiring snow in the future!

Project:52, splash photography (week 2)

(subtitle:  Timing is EVERYTHING)

So much of photography does depend on timing.  Ansel Adams is quoted as saying:  “Sometimes I do get to places just when God is ready to have somebody click the shutter.”  This is abundantly clear for landscape photography – imagine finding the perfect place to capture a brilliant sunrise only to show up early the next morning to find a cloudy, uninspiring sky – but equally true for most other genres of photography as well.  One of the most important aspects of portrait photography is the subject’s expression, and that perfect, honest expression may only last a fraction of a second.  Being a photographer is all about capturing that perfect moment, and this week’s Project:52 challenge definitely reinforced that concept.

This week Erin and I had planned to go out and do some night photography.  I was quite excited to see snow in the forecast for our chosen evening, imagining that it would be a perfect opportunity to capture some magical white flakes …  But perhaps I should have read that forecast a little bit more carefully, because with that snow came rather biting wind and temperatures that left the fingers rather frozen and us poor photographers feeling sadly uninspired.  Adventurous northern explorers we are not.  So, the evening was spent huddled around hot and tasty beverages in a nice warm coffee shop, planning ways to do INDOOR projects until the weather becomes slightly more inviting.

Our comfy substitute for night photography was some experimentation with splash photography.  I’ve seen so many amazing splash photos lately that I knew it was something I wanted to try.  So this morning we set up our studio strobes and started dropping things into a clear bowl filled with water.  (Apologies, I completely forgot to photograph our wonderful little makeshift set-up … I’ll remember for next time – we are quite innovative when trying to stay away from the cold outside!)  We quickly learnt several things, including a bunch of things that did not work, a list of things we were missing in order to achieve the perfect results, and that timing really is everything when you’re trying to catch a splash.

Attempting to do splash photography using little more than supplies found in your kitchen can be tricky.  We experimented with several styles of clear glass bowls before settling on a tall(ish) one that we could fill halfway and shoot straight through.  (Filling a bowl straight to the rim mostly eliminated the annoying rim-in-the-shot effect, but it got rather messy really quickly!)  This glass-is-half-full technique allowed us to get capture both the splash, and the object as it sunk beneath the surface.

And that, right there is the key:  attempting to catch the splash at the moment when it is at its peak, or the object just as it breaks the surface.  Without fancier and more expensive lighting gear with a much faster recycle time, our options were limited to cooperation, counting, and lots of missed shots to wade through.  It takes patience, and practice, but it’s really worth it when you finally catch that great shot.  Really excited to make another go of it and see what we can come up with next time!

splash photo, no edit

straight out of the camera. the edges of the container distract from the energy of the splash

splash photo

by cropping in and removing some of the distracting elements of the container, the image gets a lot stronger. A bit of tweaking to the hue, saturation and contrast, and bam!


Project:52, artist portraits (week 1)

One of my photography goals this year is to attempt a 52 project.  This is similar to a 365 project, which challenges photographers to take and post one photo every day for a year.  With a 52 project, you’ve got a bit more wiggle room – only one photo posted per week, but instead of complete creative freedom, the idea is to follow an assignment or capture a specific topic each week.  My original inspiration came from this site:  http://project52.org/, although I’ve seen several photographers since then with similar ideas.

While there is a great community developing around several of these websites, I’m a bit too shy to dive in to weekly critiques right now.  Well, shy … and busy.  Not sure I have the time in my schedule to properly participate in a large discourse with life as it is these days.  Luckily, I happen to have a wonderful friend who has agreed to do a mini-version of this project with me.  Erin is my business partner at Dragon-Fly Photography Studio and one of my best friends.  We originally met at the New Brunswick College of Craft and Design when we were both studying photography, and we’ve been finding ways to do joint projects ever since.  Between the two of us, I’m sure we can keep each other motivated, inspired and on task.

We decided for our first assignment to try some artist portraits.  Both Erin and I are in a position where we are trying to build our personal brand as photographers, and an important part of that is having a nice portrait to display with the artist bio and on all the various social media sites.  What better way to start off our challenge?

I also think it’s a great idea for photographers to spend some time, every once in a while, in front of the camera.  It’s a great chance, particularly for portrait photographers, to get a real feel for how our subjects feel during a portrait session.  I’m always a little bit self-conscious when attention (or a lens!) is focused on me, so spending time in front of the camera reminds me to make sure I’m extra encouraging, open and engaging when I’m photographing others.

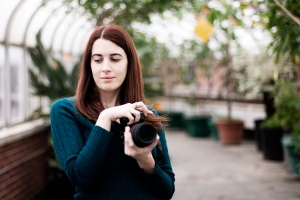
Of the series of portraits I shot of Erin, this is easily my favourite.  And it wasn’t even meant to be a ‘keeper’.  I was just testing the lighting in the scene and experimenting with composition.  But for some reason, I’m drawn to it.  Not only do I love the framing  and the perfect separation between the subject and the background (note how the light creates a subtle glow around her hair and shoulder), but I think I really see Erin, as an artist and photographer, in this picture.  I’ve always loved candid portraiture, both for the shy factor (you don’t have to direct or manage people, and your goal is to be as unobtrusive and invisible as possible) and for the honesty of the expressions and moments you are able to capture.  Erin can be a really quiet person around those she doesn’t know and she, like most photographers I know (including me!), isn’t a huge fan of getting her portrait taken.  So a standard “face the camera and smile” pose just didn’t seem right to express her personality.  Capturing a moment of reflection is much more honest.  Erin’s artwork is often quiet and introspective too, so this image fits quite nicely with the way I see my friend.

Next week’s challenge?  Night photography!
Looking forward to hanging out on top of a parking structure to see what unique twilight shots we can get of our little city.